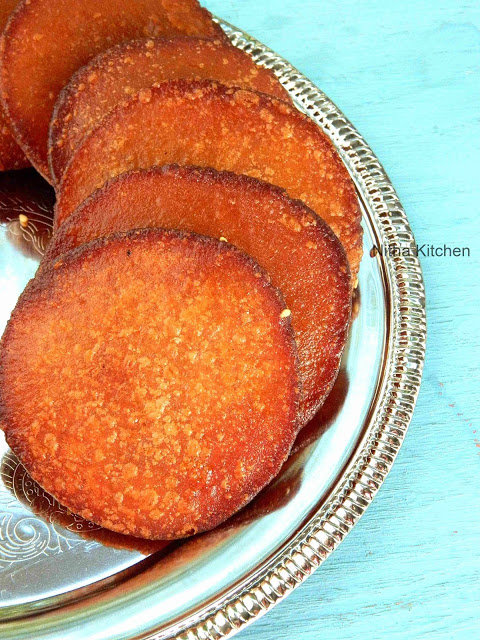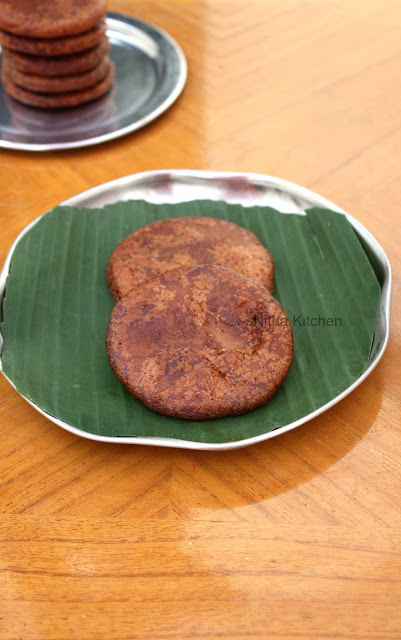
Authentic Nattu Sakkarai Adhirasam Recipe : Diwali is nearing let me gear up the colorful festival with an authentic and superb sweet Adhirasam. My kids usually call them as brown cookies and even my H who is a sugar dis-liker also likes this sweet so once in a while I have to make it especially for them. If you are my serious follower then you may wonder why I am re posting Athirasam recipe.
I have to admit here that my first version is still popular in the blog and today’s version has a quite easy jaggery preparation so you may never go wrong in syrup consistency and for beginners I assure this one is going to be a no fail version. During my summer vacation my mom
made this version several times and nowadays she use brown sugar , nattu sarkarai/Unrefined natural sugar (you can use jaggery as well) to make this sweet. For the first time ever I keenly noticed how My Mom and Chithi (the two super skilled ladies) make and I have clicked few pictures too (pictures follows for ur view). I have added few important points to make perfect and authentic Adhirasam Using Brown Sugar below, please do read it before you start and also don’t forget the tips section that will be too useful for you to nail this recipe.
- One thing you have to notice here is Oil. I have packed the same rice and sugar from India and then I made them recently. Only change is oil, there I used refined oil to frying athirsams but here in US, you know the vegetable/canola oils has the tender to give little crispiness to athirasam that I noticed it for a long time. If possible try to fry them with sunflower oil otherwise use whatever you have (to keep them soft add a little thick dough), it seems little crispy immediately after frying but later ie after two days they becomes soft.
- Also for soft adhirasam another important thing is flatten each round to medium thickness nor too thick (wont cook inside) nor thin (yields crispy ) as shown in picture below.
- Adding sesame seeds is optional they give nice flavor, if you forget to add in the dough you can top it (press well) while flattening the adhirasam.
- This recipe gives super sweet adhirasam and if you want to reduce sweetness reduce 1/4 cup sugar from the recipe and water remains the same.
- Use stainless steel vessels to store the athirasam batter for fermentation, which gives good result.

Nattu Sakkarai Adhirasam Recipe I My Mom’s Way
- Soak the rice for at least 2 hours.
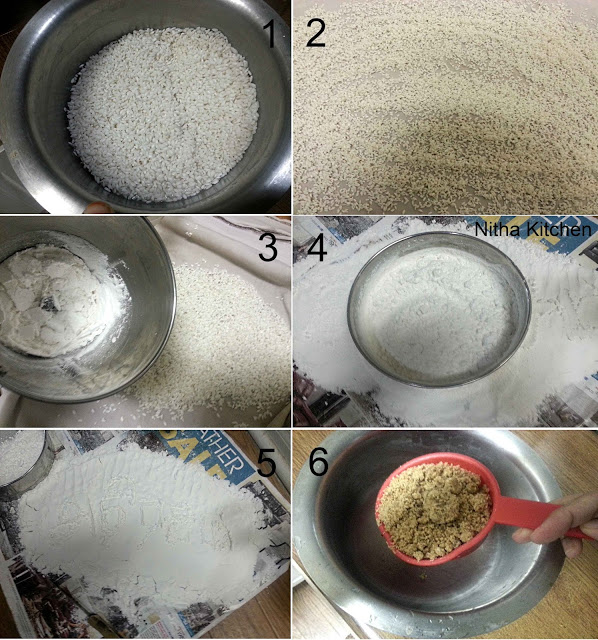
- Drain the excess water and in shadow pat dry them as shown in Picture 1 for 30 minutes.

- In Maavu/Rice Mill or using Kaikuthal Ulakai powder them in batches and sieve (optional) to make the fine flour.
- 2 padi (measurement) raw rice yields 4 padi Rice Flour.
- Now coming to jaggery preparation, she uses the same padi alavu (Pic 3 above) so for 4 padi rice flour you need 1.75 padi jaggery and little less than 1/2 padi water.

- Bring water and sugar/jaggary to boil when syrup comes to think consistency (5-8 minutes approx in medium flame) as shown in figure 5, filter it.
- Then add it to the grind flour and keep stirring simultaneously (Pic 6).
- Now the batter looks like shown in picture 7 , stop adding syrup and if needed you can add tsps at a time for right consistency (Pic 8) also refer the Video for mixing part.
- Actually it should ferment well, and they keep at room temperature for 5 days maximum and you can store them in fridge as well (refer tips section).
- Now move on to the frying part below.
- Look how soft they are 🙂

Nattu Sakkarai Adhirasam Recipe II My Way
- Soak the rice for 2 hours, I used Maavu Arisi (Pic 1).
- Drain the excess water, pat dry over cloth for 30 minutes (Pic 2).
- Grind the rice in batches, Picture 3 (for 2 cups 4 batches approx).

- Sieve the flour immediately after grinding it (Pic 4). So when you have coarse rice (leftovers) you can include it in the next batch of grinding.
- Once done with preparing rice flour press it tightly (Pic 5) till you prepare the jaggery/sugar syrup so that you can prevent flour from drying out.

Jaggery Preparation
- Measure the jaggery or Natural unrefined Sugar (Naatu sarkarai), Picture 6.
- Add 1/3 Cup + 2 Tbsp of water to the sugar (Pic 7).
- In medium flame boil, you can filter it once sugar gets dissolved(Pic 9) and bring it to boil in 5-8 minutes (approx) you will get foam from the syrup (Pic 10) and start testing for the consistency.

For that take water in a small cup add few drops of jaggery syrup, if it is in right consistency the jaggery should stand separate from water and when you rub it with your finger you can see an impression there, Picture 11 (anyways the syrup wont dissolve with water).

Adhirasam Mixing Part
- Take the above hot syrup and mix it with prepared rice flour (Pic 12).
- Beginners do preserve few tbsps of jaggery and rice flour too before mixing together. That way you can finally adjust the consistency.
- Add the cardamom powder, sesame seeds if using and mix all together.

- Do check the Video how i am mixing, if at any point you are not attaining this consistency and if the batter is tight add more preserved syrup on the same hand if the batter is gooey add more preserved rice flour, add a tsp at a time.
- Keep stirring for few minutes so that the heat evaporates quickly.
- Once cooled down completely cover the top and let rest in room temperature for over night to 3 days maximum (Pic 13).
- Once you are ready to fry make equal size balls from the dough(Pic 14).

Batter Demonstration
- I have recorded the above video in single hand so do bear with it.
- There is a full video of making adhirasam at the bottom of this post do check it….
- Initially the batter should flow like folding ribbon.
- After 5-6 minutes the jaggery gets absorbed a bit and tightens as shown using fork.
- So this is the right consistency, leave the dough little loosen so that after 8 hours of fermentation it turns to perfect one.
Frying Part
- Take a plate/ziploc sheet grease the top with oil, take a ball (Pic 14) and flat over it to round shape with medium thickness for soft athirasam (Pic 14).
- Once you start flatting each balls to round shape simultaneously heat the oil in a wok.
- Here the frying temperature is also one main important point to note.
- In medium flame you have to fry it. The oil should not be hot and also not less in temp. Too hot temperature makes the athirasam to turn golden brown quick and inside won’t cook properly. The too less temp makes the athirasam to turn hard and crisp.
- So maintain a right temp (while adding the raw athirasam the oil should be bit hot then reduce the temperature), add one at a time when one starts puffing up add the next one (Pic 1 below).
- The puffing athirasam (Pic 1) is the right sign for good athirasam.
- Once it reaches golden brown, take two spatulas drain the excess oil (Pic 2), also wipe it all over using kitchen paper towel to remove excess oil around and keep aside in a plate.
- Note I have added few sesame seeds on the top before frying as shown in Picture 15 above.
- The fried athirasams (Pic 15) once cooled down store in air tight container at room temp.

Authentic Nattu Sakkarai Adhirasam Recipe
Ingredients
Ponni Raw Rice/Pachai Arisi or Sona Masoori Rice – 2 Cups ( You can ask it as Maavu Arisi in stores in and around Salem/Coimbatore)
Unrefined Natural Brown Sugar ( Nattu Sarkkarai ) OR Jaggery – 1.75 Cups
Water – 1/3 Cup + 2 Tbsp
Cardamom Powder -2tsp
Sesame seeds – 1 Tbsp (Optional)
Oil – 1.5 Cups or as needed to deep fry
Yields – 18 Adhirasam, each ball may weight approx 40 grams before flattening
And here is a complete video for making Adhirasam….
Tips
- You can store the Athirasam dough in an air tight container in refrigerator for more than a month.
- When you are about to deep fry take the dough as needed keep it out at room temperature for 1 hour at least.
- If the dough is too hard add few drops of milk, mix it and make balls, flat it round, then fry them in oil as mentioned above.

Print Recipe

Learn to make traditional Adhirasam Athirasam Kongunadu Kachayam recipe from scratch!
- Ponni Raw Rice/Pachai Arisi or Sona Masoori Rice – 2 Cups You can ask it as Maavu Arisi in stores in and around Salem/Coimbatore
- Unrefined Natural Brown Sugar Nattu Sarkkarai OR Jaggery – 1.75 Cups
- Water – 1/3 Cup + 2 Tbsp
- Cardamom Powder -2tsp
- Sesame seeds – 1 Tbsp Optional
- Oil – 1.5 Cups or as needed to deep fry
-
Soak the rice for 2 hours, i have used Maavu Arisi (Pic 1).
-
Drain the excess water, pat dry over cloth for 30 minutes (Pic 2).
-
Grind the rice in batches, Picture 3 (for 2 cups 4 batches approx).
-
Sieve the flour immediately after grinding it (Pic 4). So when you have coarse rice (leftovers) you can include it in the next batch of grinding.
-
Once done with preparing rice flour press it tightly (Pic 5) till you prepare the jaggery/sugar syrup so that you can prevent flour from drying out.
-
JAGGERY PREPARATION
Measure the jaggery or Natural unrefined Sugar (Naatu sarkarai), Picture 6.
-
Add 1/3 Cup + 2 Tbsp of water to the sugar (Pic 7).
-
In medium flame boil, you can filter it once sugar gets dissolved(Pic 9) and bring it to boil in 5-8 minutes (approx) you will get foam from the syrup (Pic 10) and start testing for the consistency.
-
For that take water in a small cup add few drops of jaggery syrup, if it is in right consistency the jaggery should stand separate from water and when you rub it with your finger you can see an impression there, Picture 11 (anyways the syrup wont dissolve with water).
-
MIXING PART
Take the above hot syrup and mix it with prepared rice flour (Pic 12).
-
Beginners do preserve few tbsps of jaggery and rice flour too before mixing together. That way you can finally adjust the consistency.
-
Add the cardamom powder, sesame seeds if using and mix all together.
-
Do check the Video how i am mixing, if at any point you are not attaining this consistency and if the batter is tight add more preserved syrup on the same hand if the batter is gooey add more preserved rice flour, add a tsp at a time.
-
Keep stirring for few minutes so that the heat evaporates quickly.
-
Once cooled down completely cover the top and let rest in room temperature for over night to 3 days maximum (Pic 13).
-
Once you are ready to fry make equal size balls from the dough(Pic 14).
-
Frying Part
Take a plate/ziploc sheet grease the top with oil, take a ball (Pic 14) and flat over it to round shape with medium thickness for soft athirasam (Pic 14).
-
Once you start flatting each balls to round shape simultaneously heat the oil in a wok.
-
Here the frying temperature is also one main important point to note.
-
In medium flame you have to fry it. The oil should not be hot and also not less in temp. Too hot temperature makes the athirasam to turn golden brown quick and inside won’t cook properly. The too less temp makes the athirasam to turn hard and crisp.
-
So maintain a right temp (while adding the raw athirasam the oil should be bit hot then reduce the temperature), add one at a time when one starts puffing up add the next one (Pic 1 below).
-
The puffing athirasam (Pic 1) is the right sign for good athirasam.
-
Once it reaches golden brown, take two spatulas drain the excess oil (Pic 2), also wipe it all over using kitchen paper towel to remove excess oil around and keep aside in a plate.
-
Note I have added few sesame seeds on the top before frying as shown in Picture 15 above.
-
The fried athirasams (Pic 15) once cooled down store in air tight container at room temp.
- One thing you have to notice here is Oil. I have packed the same rice and sugar from India and then i made them recently. Only change is oil, there i used refined oil (i took part in frying athirsams there as well) but here in US you know the vegetable/canola oils has the tender to give little crispiness to athirasam that i am noticing for a long time. If possible try to fry them with sunflower oil otherwise use whatever you have, while frying it seems little crispy but later ie after two days they becomes soft.
- Also for soft athirasam another important thing is flatten each round to medium thickness nor too thick nor thin as shown in picture below.
- Adding sesame seeds is optinal they give nice flavor, if you forget to add in the dough you can top it(press well) while flattening the athirasam.
- This recipe gives super sweet athirasam and if you want to reduce sweetness just reduce the sugar a bit and water remains the same.
- Use stainless steel vessels to store the athirasam batter for fermentation, that gives good result.
- You can store the Athirasam dough in an air tight container in refrigerator for more than a month. When you are about to deep fry take the dough as needed keep it out at room temperature for 1 hour at least. If the dough is too hard add few drops of milk, mix it and make balls, flat it round, then fry them in oil as mentioned above.
Thank you posting with details. You are amazing. I used to help my mother all the time. But I can't do it as good as she used to do. My problem is with syrup. Never comes out good.
Vijaya thanks for stopping by hope my detailed pictures and videos help you to attain perfect Adhirasam. Good luck…
Nice post, Navratri being a nine-day long festival, a range of dishes are prepared during this occasion.
Good post . Thanks for sharing
I have been finding it very difficult to get athirasam right. Thanks for the video showing right consistency and nice detailed post.