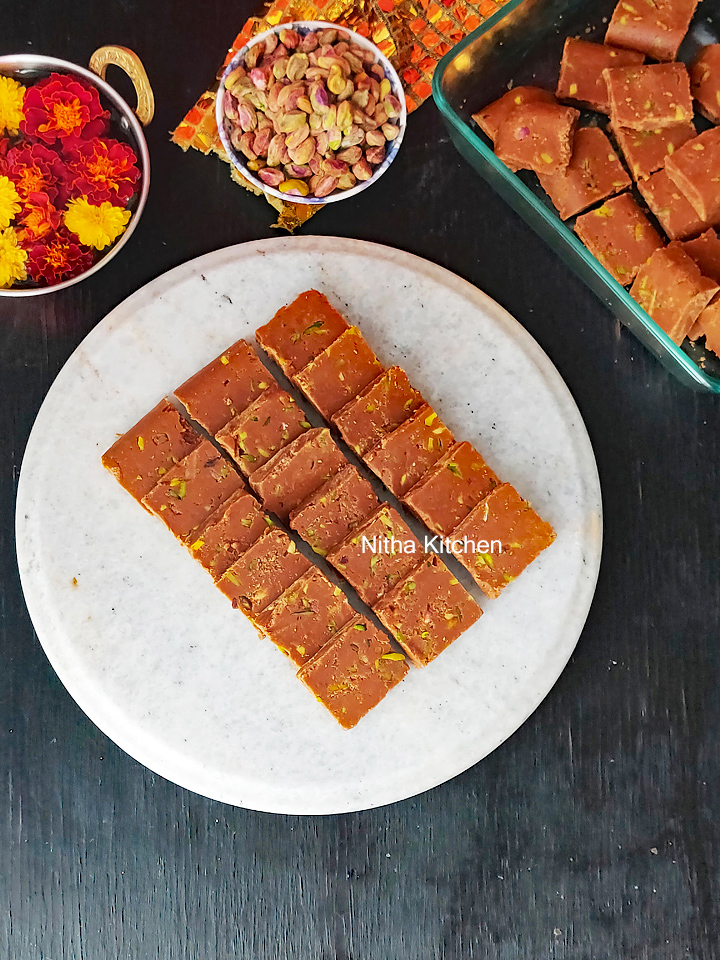
Bournvita Burfi, a melt in mouth Indian delicacy and you wouldn’t stop with just one 😁. The recipe uses Bournvita, gram flour, ghee and sugar as main ingredients. Instead of chocolate I use Bournvita, the chocolate based health drink powder to make this burfi and hence the name. Do check the “Variations” in the below post to alter ingredients. It’s been my last 4 years of plan to post this recipe in blog. This year somehow I got time to post it on time before Diwali with a detailed video tutorial. Every year

I just stick with this same recipe and sometimes I double (this year I doubled) or triple the quantity depending on the need at home. So, if I am making it again and again means there is some die hard fan at home tomorrow Burfi right? Well guess who’s favorite is this Bournvita Burfi? I will reveal it at the end of this post 😃
In my last few years of Diwali sweets and snacks pictures this Burfi was there without fail and my family always praise it as it’s better than the bakery Burfi. Since childhood I am a ardent fan of Boost or Bournvita and never took coffee and tea till giving birth to my kids.
While running behind them when they were young, I needed something to energize and hence started drinking coffee or tea once in a day and that addiction is still on with a reduced in take. Coming to Bournvita , it was suggested by pediatrician when my kids were infants and they had strong dislike towards Infant formulas. Since then I started giving this health mix to my kids and it’s continuing.
Key Points
There are few key points to note before making, they are
- Roasting Gram Flour
- Perfect sugar syrup string consistency
- Right texture of burfi mixture before setting it
- Also don’t make more than the specified quantity at once, stirring burfi becomes tough if you do so.
- Do check the video tutorial for the clear bournvita burfi making process.
What is Burfi?
Burfi or Barfi is a popular milk based Indian sweet / fudge prepared during any important festival occasions like Deepavalli / Diwali, Holi, Rakhi etc. The texture of burfi is soft and melts in mouth because of the presence of milk and ghee. I have the plain halwai style Milk Burfi using instant milk powder. Its the base for most of the burfi, in that variations in ingredients for example replacing milk with milk powder or milk solids (khoya) or replace milk with nuts powder/besan/millet flour/coconut and enhancing the flavor with cardamom, cocoa, chocolate, rose essence, vanilla etc and also altering the sweetener leaves the world with several burfi varieties.
I have few collections in my space do check it out below
- Quick Milk burfi Using Instant Milk Powder
- No flour Jaggery Burfi / Dodha Burfi
- No Ghee Kaju Burfi
- Bakery Style Anjeer Stuffed
- Kaju Burfi
- Ragi Millet Chocolate Burfi
- Bournvita Burfi (This Recipe)
- Maida Burfi
- Chana Dal Burfi

11 special snacks with mix of birthday girls favorite and vandu’s favorite.
🪔 3 different varieties Adhirasam
Ragi Millet Chocolate Burfi
Chocolate Burfi ( this recipe)
Lauki Barfi
Jhangri/ Imarti
Boondi Ladoo
Boondhi Mixture
Milk Burfi
Instant Mix Gulab Jamun
Sweet Boondi (recipe later)
Eggless Rose Tres Leches Cake😉
Talk about Ingredients
Sugar
I do use Raw Cane Sugar everyday, so does for the sweets and even for most of baking recipes. Do check the variation section for alternatives to the ingredients I listed.
How to make it Vegan
Since the health mix powder I use is not vegan do replace it with cocoa powder or vegan chocolate bars. Also use vegan butter based ghee/clarified butter to make this burfi.

Variations
If you want a variation in this recipe with reduced ghee or to replace gram flour with any other healthy flour do check Ragi chocolate Burfi, a healthy version in my space. Also detailing the reduced version of this recipe here as well.
- You can easily replace raw cane sugar with regular sugar or brown sugar for this recipe.
- So how much sugar you can reduce in this recipe, since the health mix powder has sugar do reduce 1/4 Cup sugar and do reduce water accordingly to make syrup .
- For 1 cup sugar 1/2 cup water is the right proportion to make syrup.
- Coming to ghee its the right quantity after adding syrup you may have 1 to 1.5 tbsp. of ghee left, and I use at that time to this recipe if you want to skip do skip it.
- This is a gluten free recipe and if you want to make it nuts free do skip pistachios used in the decoration part.
Why Burfi doesn’t set
There are couple of reasons if burfi is not set and sticky.
- If you are not up to the right sugar string consistency.
- If you have reduced too much sugar mentioned in the recipe.
- You have undercooked the burfi mixture.
- If you try to set a gooey burfi mixture before reaching right consistency.
What to do with unset burfi?
The burfi mixture should be non sticky and gather as a mass, if not it won’t set properly. After several hours if its not , and sticky to your hands I have few tips to overcome.
- Do make a small portion of sugar syrup with 1/4 cup sugar and 2 tbsp water.
- This syrup helps to melts the partially set, sticky or gooey burfi.
- Take the unset /sticky burfi mixture in a pan, warm it in low flame.
- Pour the prepared syrup (you no need to pour all), and keep mixing so the burfi melts and comes back to mixing consistency.
- Now stir the burfi mixture in low flame until it reaches the right consistency explained in video and the pictures below.

Bournvita Burfi Ingredients
Bournvita – 1/3 Cup
Raw Cane Sugar/ Regular Sugar – 1.25 Cups (You can reduce 1/4 cup from this recipe)
Water – 1/2 Cup + 2 Tbsp (1/2 cup if using 1 cup sugar)
Gram flour / Besan- 1 and 3/4 Cup
Ghee – 1/2 Cup
Slivered Pistachios – To Decorate
How to prepare the Burfi Tray
There are two ways to prepare the tray for this bournvita burfi. Explaining both
- The first method is adding the burfi mixture directly to the tray to set.
- For that grease a glass rectangle tray with ghee (pic 1)
- Sprinkle slivered pistachios (Pic 2) and start making burfi.
- Once burfi is set use sharp knife to cut and make squares.
- In this method burfi comes out clean with neat edges (pic 3).
- If you are not convenient with using sharp knife over glass bowl do check the next method.

- For that grease the tray with ghee.
- Later add a parchment paper, hang extra on sides to pull it out (pic 6) once burfi is set.
- Again add ghee over parchment paper and sprinkle slivered pistachios (Pic 5).
How to make Sugar Syrup
- In a sauce pan add sugar (Pic 1).
- To that add water and bring it to boil (Pic 2).

- When sugar dissolve and starts foaming (Pic 3) do start checking for one string consistency.
- There are two ways to check it.
- When you add drops of syrup to cold water, the syrup floats a fraction of seconds like shown in Picture 4.
- It stays separate from water and when you rub it leaves track like shown in Picture 5.
- Otherwise do check syrup between fingers, and only syrup gets cooled down it forms a string like shown in Picture 6.
- If the string doesn’t break and stretches in between your fingers that’s the right consistency.
- While checking do simmer or switch off the boiling syrup.

How to make Bournvita Burfi
- Do make the syrup keep aside and start to dry roast the flour.
- Add flour to a wide pan.
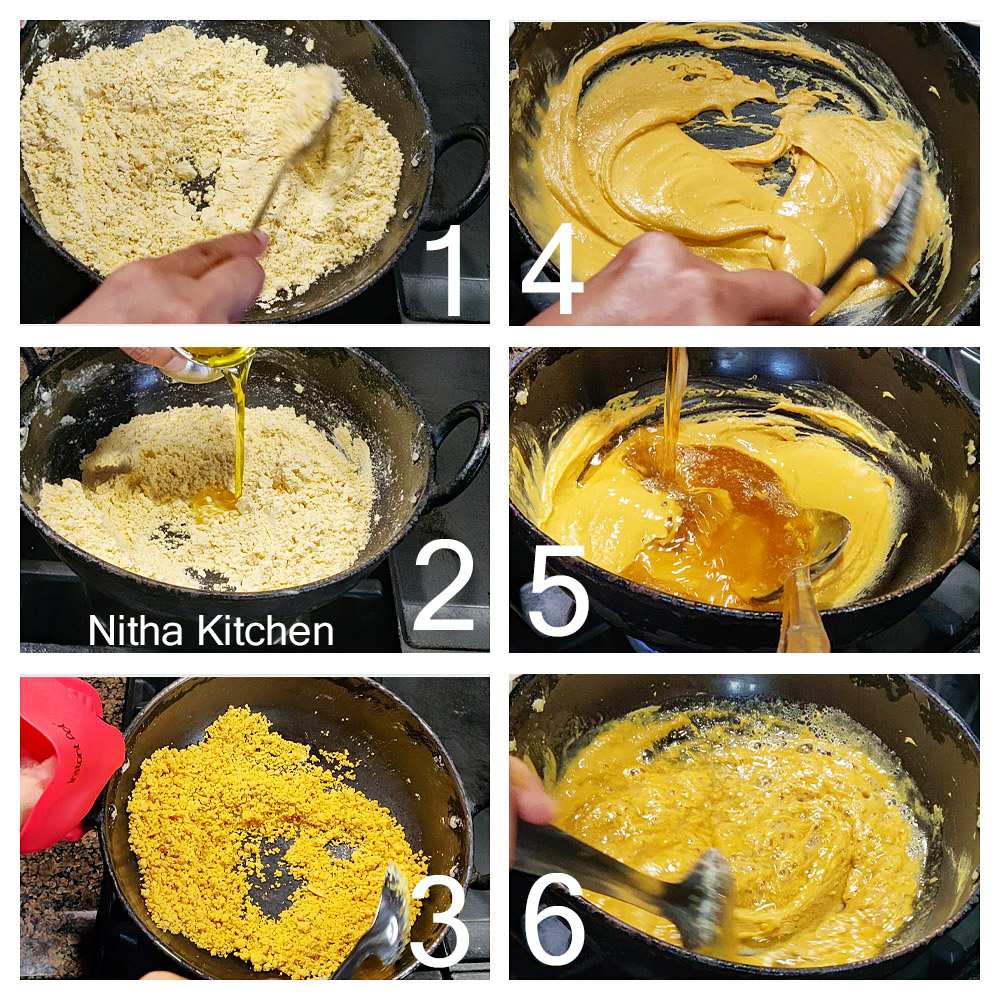
- Dry roast in low flame (Pic 1) without burning for 8 minutes or until raw smell disappears.
- While roasting do stir often.
- Later add ghee in batches and roast the flour until it reaches nice aroma.
- Don’t pour the ghee in one stretch do add in batches (Pic 2) until I instruct so.
- Picture 3 is after 15 minutes of roasting including dry roast time.
- The totally roasting time is 25 minutes approx (including dry roast time) just before adding sugar syrup.
- So after 25 minutes the besan ghee mixture looks like shown in Picture 4.
- When it attains this stage stop adding ghee and reserve it to use later.
- Have provided very detailed video tutorial for beginners so do check it out.

- Now add prepared syrup, if it turned cold do warm it before adding.
- So while adding warm syrup to hot besan ghee mixture, it froths like making mysore pak (Pic 6).
- Do add bournvita (Pic 7) as it is.
- Stir quickly so that it dissolves with the already cooking burfi mixture (Pic 8).

- If you are not comfortable, do mix bournvita in 2 tbsp hot water.
- Later add to the burfi mixture like shown in Pic 9.
- Either way works and continue stirring the burfi in low flame (pic 10).
- Do keep an eye so not to burn the mixture at any cost.
- Add the rest of optional ghee when it sticks to pan.
- Mine is not a non-stick pan, if you use it, then it wont stick to the sides of the pan.
- The right texture is shown in Picture 11 & 12, so if it attains this stage do remove from heat.
- If not check by pinching out a small portion and do roll with your fingers if its not sticky and rolls as a ball then its the right consistency (Pic 2 below).
How to set Bournvita Burfi
Here also I am going to show two techniques to set the burfi.
- Immediately once burfi is out from the heat drop it over prepared parchment placed tray (Pic 1).
- Using ghee greased spoon to level the burfi mixture (Pic 3) and leave it as it is at the room temperature to set.
- It takes few hours to set.

- Bournvita burfi sets quickly so if you take sometime to place over tray then it hardens in the cooked pan itself.
- If happened so don’t get panic, do drop the harden burfi mixture to the prepared tray like shown in Pic 4.
- Using any weight press and level the burfi like shown in Picture 5.
- This method of burfi sets very quickly (Pic 6), since it is already started to harden.
How to cut Bournvita Burfi
- Once burfi is set, pull out the parchment paper out from the tray.
- Picture 2 shows the back of the well set porous burfi.
- Picture 3 shows the texture of perfectly harden burfi.
- Slice in to 16 pieces and each piece of 1.5inch length and width (pic 4).
- If poured burfi mixture on the glass tray directly. once set using sharp knife slice in to 16 or 20 pieces like shown (Pic 5).

- Pull out the corner one burfi piece first.
- Later its easy to pull out the rest of pieces from the tray.
- I used pyrex rectangle glass bowl.
Bournvita Burfi Recipe Card

- Bournvita – 1/3 Cup
- Raw Cane Sugar/ Regular Sugar – 1.25 Cups
- Water – 1/2 Cup + 2 Tbsp
- Gram flour / Besan- 1 and 3/4 Cup
- Ghee – 1/2 Cup
- Slivered Pistachios – To Decorate
-
In a sauce pan add sugar (Pic 1).
-
To that add water and bring it to boil (Pic 2).
-
When sugar dissolve and starts foaming (Pic 3) do start checking for one string consistency.
-
There are two ways to check it.
-
When you add drops of syrup to cold water, the syrup floats a fraction of seconds like shown in Picture 4.
-
It stays separate from water and when you rub it leaves track like shown in Picture 5.

-
Otherwise do check syrup between fingers, and only syrup gets cooled down it forms a string like shown in Picture 6.
-
If the string doesn’t break and stretches in between your fingers that’s the right consistency.
-
While checking do simmer or switch off the boiling syrup.
-
Do make the syrup keep aside and start to dry roast the flour.
-
Add flour to a wide pan.
-
Dry roast in low flame (Pic 1) without burning for 8 minutes or until raw smell disappears.
-
While roasting do stir often.

-
Later add ghee in batches and roast the flour until it reaches nice aroma.
-
Don’t pour the ghee in one stretch do add in batches (Pic 2) until I instruct so.
-
Picture 3 is after 15 minutes of roasting including dry roast time.
-
The totally roasting time is 25 minutes approx (including dry roast time) just before adding sugar syrup.
-
So after 25 minutes the besan ghee mixture looks like shown in Picture 4.
-
When it attains this stage stop adding ghee and reserve it to use later.
-
Have provided very detailed video tutorial for beginners so do check it out.
-
Now add prepared syrup, if it turned cold do warm it before adding.
-
So while adding warm syrup to hot besan ghee mixture, it froths like making mysore pak (Pic 6).
-
Do add bournvita (Pic 7) as it is.
-
Stir quickly so that it dissolves with the already cooking burfi mixture (Pic 8).

-
If you are not comfortable, do mix bournvita in 2 tbsp hot water.
-
Later add to the burfi mixture like shown in Pic 9.
-
Either way works and continue stirring the burfi in low flame (pic 10).
-
Do keep an eye so not to burn the mixture at any cost.
-
Add the rest of optional ghee when it sticks to pan.
-
Mine is not a non-stick pan, if you use it, then it wont stick to the sides of the pan.
-
The right texture is shown in Picture 11 & 12, so if it attains this stage do remove from heat.
-
If not check by pinching out a small portion and do roll with your fingers if its not sticky and rolls as a ball then its the right consistency (Pic 2 below).
-
Here also I am going to show two techniques to set the burfi.
-
Immediately once burfi is out from the heat drop it over prepared parchment placed tray (Pic 1).
-
Using ghee greased spoon to level the burfi mixture (Pic 3) and leave it as it is at the room temperature to set.

-
It takes few hours to set.
-
Bournvita burfi sets quickly so if you take sometime to place over tray then it hardens in the cooked pan itself.
-
If happened so don’t get panic, do drop the harden burfi mixture to the prepared tray like shown in Pic 4.
-
Using any weight press and level the burfi like shown in Picture 5.
-
This method of burfi sets very quickly (Pic 6), since it is already started to harden.
-
Once burfi is set, pull out the parchment paper out from the tray.
-
Picture 2 shows the back of the well set porous burfi.
-
Picture 3 shows the texture of perfectly harden burfi.
-
Slice in to 16 pieces and each piece of 1.5inch length and width (pic 4).
-
If poured burfi mixture on the glass tray directly. once set using sharp knife slice in to 16 or 20 pieces like shown (Pic 5)

-
Pull out the corner one burfi piece first.
-
Later its easy to pull out the rest of pieces from the tray.
-
I used pyrex rectangle glass bowl.
Recipe Video

[…] Tbsp of chocolate or any health mix drink like Bournvita like shown in the video (will post another chocolate burfi recipe […]